
|
|
| Basic Traps Wednesday, May 13, 2009 9:59 pm — Guide posted by jebby |


 ShareThis
« jebby's Blog
Introduction to Traps
As a beginner at making and designing caves, you need to figure out the structure of caves before you get imaginative. In this section, I’m going to give you a few examples of basic traps that you can use in your cave to make it look half-decent. Let’s remind ourselves of what a trap is exactly:
‘A trap is an assembly of different tiles that forces Hannah to move in some way, usually by threatening death or a blockage that makes the cave impossible. Traps almost always feature arrows and/or dynamite.’
Traps vary in size and shape and difficulty. Some may be easy to figure out just before you attempt to beat them. Some are a little harder to work out. Some require you to look at the map before trying. The hardest traps are the ones where you are given no clues at all on how to beat it (mainly because you are forced into them or certain aspects of the trap are hidden) and these have to be beaten by trial and error. The ones I’ll be showing you in this section are ones that you can stand outside and have a good look at before you try them.
SOIL – What Every Good Trap Needs
So then, what does every trap need? There are things that the majority of basic traps have in them. They are:
- Set-up: a trap that encourages or forces a player to get an objective
- Objective: a goal that is the reward for beating the trap – usually the entrance to the next room or a treasure chest or two
- Incentive: a reason for playing the trap – threat of the exit being blocked/death/not getting all treasures/basically making the cave impossible
- Limitations: boundaries that prevent incentive from being lost – limits to the trap that stops a player from getting through the trap while avoiding the incentive
There is always a set-up and there is always an objective, but sometimes there isn’t an incentive and there aren’t any limitations. You may give the player a choice as to whether they play the trap or not (no incentive) so as to confuse/distract them or perhaps to give them more than one possible route to the door.
Some traps aren’t meant to lack boundaries, but some do. The aim of every trap is to make it ‘airtight’ so that no player can get to the end of it stress-free. It’s surprisingly hard to do this as good players have skills and tricks up their sleeves that can get around even the most difficult of traps. Whenever you make a trap, always check to see if there are any ways that a player can avoid it. Play it yourself and play the trap to your best standard and then tighten it until you’re sure it’s airtight.
The Exit Blocker
Now to go through a few standard traps, I’m going to show the same traps with and without incentive/boundaries and I’ll point out the difference it makes.
Below is the exit blocker in its simplest form. The game has just begun; Hannah is forced to hit the arrow and is then forced to run to the exit before the steel crates come down and block her way. The set-up is the arrow that connects with the steel crates. The objective is the exit. The incentive is the threat of not getting to the exit in time and having to restart the game. The limitation is the box of terrain. Another limitation is the fact that Hannah is forced to hit the arrow. If you were to take this limitation away, Hannah would be able to avoid the trap.
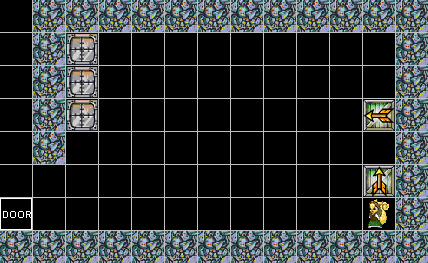
Here is the same trap without boundaries or an incentive. There is a way in which Hannah can get to the exit without going through the trap and she isn’t forced to set the trap off (minus boundaries). There is no incentive as the trap isn’t going to block her way unless the arrow is hit.

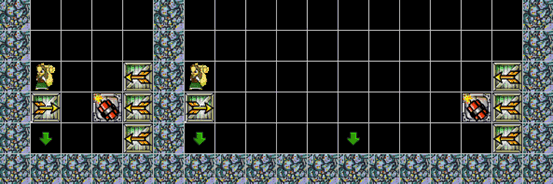
Starting Position Avoidance
Pretty obvious stuff, isn’t it? Perhaps not. This is a really simple example where the missing boundaries and incentive are clear. There are some things that new players often miss when making traps airtight and one of those things is starting position avoidance. This means that the starting position enables you to avoid the first trap. Look at the next image – you can’t avoid either trap, right? The one on the left is avoidable because of an unusual glitch in HATPC. The starting position in the actual game is always slightly to the left of where you place it in the cavemaker. It isn’t on the next square along, it is about half way. Therefore, if you hold Left down when you start the game, you can just swerve out of the way of the arrow. This isn’t possible when holding Right down. In the right half of the image, this solution isn’t possible as the steel crate is preventing Hannah from falling to the left of the arrow. There is another way of avoiding the dangers of this trap and setting it off at the same time; can you guess what it is?

Although the trap will have to be set off on the right hand side, you can avoid the first set of arrows and any other two-high arrows that come along by jumping on top of the steel crate. If these arrows were the only one endangering you then, it makes sense to jump over them directly, but if there are more layers of arrows coming then jumping on the steel crate is a good idea.
Invincibility Avoidance
As you may know, you get a few seconds of invincibility when you first start a game. Players could use this against your cave and beat good traps that you have made at the beginning by avoiding it with invincibility. Look at the next example. The image on the left shows Hannah starting the game by setting off a trap immediately. You’d think this would be impossible to avoid. It’s not – all you have to do is stay where you are and the arrows will hit you harmlessly. This is all because of the few seconds of invincibility you have at the start of a game. The image on the right is different; the danger arrows are further away – by the time they get to you, your invincibility will have run out and they will kill you. That’s if you stay where you are; if you run into the arrows (going to the green arrow in the picture), you’ll meet them quicker and should survive. When you’re making these starting traps, you need to test whether they can be avoided by invincibility.
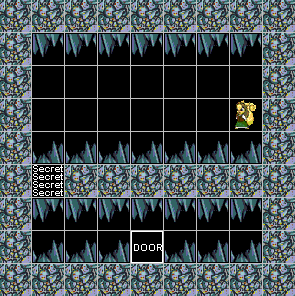
Staying on the topic of invincibility, it’s sometimes a good idea to push it to its limits in a trap – with spikes. Put the starting position over a load of spikes and force the player to get through a small spiky cavern to get to safety before their invincibility runs out. Test it until you can only just get out in time. A player looking at the map for this cave might think that it’s impossible, but it’s not. Just hold Left down, drop through the secret area and head right to the door.
Beware of Shortcuts
The easiest way of avoiding a trap or at least making it easier is by using shortcuts that a careless cavemaker has left in. Your aim is to ensure that no shortcuts are available. The most common shortcuts made by new cavemakers involve platforms. In the picture below, Hannah has to get to the top before the boulders fall and the final platform is destroyed. The cavemaker here has intended that the player hops side-to-side up the platforms. When you’re new to cavemaking, it’s easy to forget how far Hannah can jump and that she can jump up through platforms. Therefore, you just need to jump up a few times to beat the trap in half the time.
Here’s the same trap again, but this time the cavemaker has been clever and forced the player to go on the side platforms as there are treasure chests on them that need to be collected. This is the simplest solution:
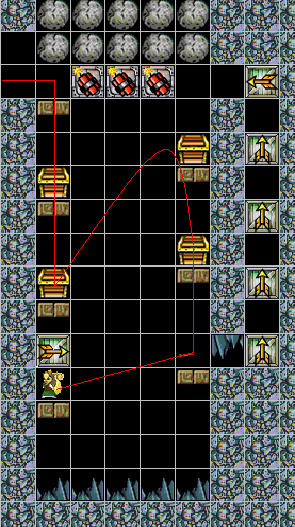
Once again, the player has foiled the rookie cavemaker who probably tested it in with more difficult solutions. It is so hard to control a player’s movements without making a cave very restrictive. Here’s how I’d make them do it the hard way:
The floating treasure chest forces the player to jump on to the treasure-lacking platform without disrupting the arrow path. The spikes force the player to perform difficult jumps that take a bit more time than a more ordinary route. Remember that when you’re testing, always test on the easiest solution possible (make sure it isn’t actually easy, just easier than the others) and try and make that the ONLY route possible. This forces the player to think about what they’re doing. Although it is mainly skilled required in the example, it is a simple puzzle cave as the player has to figure out the quickest way to get to the top with all the treasure.
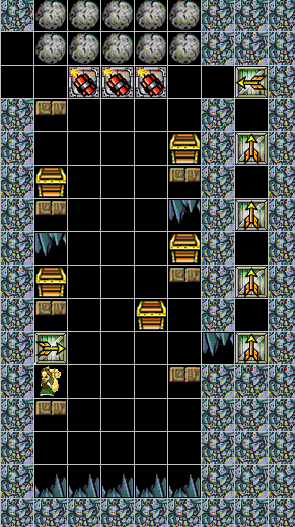
Another common blunder in new cavemakers is letting walking paths across platforms appear. When there are two platforms with a one-square gap between them, you can just walk across them as Hannah is somehow lifted up on to the second platform after falling off the first. This is something that many new cavemakers do not know and leave gaping open in their traps. For instance, in the next image, the player is supposed to jump from one platform to another. A quicker way would be to just across the gaps.
Notice that there are terrain blockers to force you to jump one at a time (assuming you don’t walk)? Well, if you were to take these away, walking would no longer the quickest option. The player could jump two platforms at a time and then walk across the last platform; this is a bit faster than walking all the way. Always make sure you find and test the easiest route across platforms.
The Thief
Thieves get their name from the fact that the treasure chests that are available in the trap are stolen from you. You run towards the pile of treasure chests and they are suddenly dropped down a spiky pit – not nice. Here are a couple of examples of this type of trap:

The set-up of the arrows wouldn’t be like this, but you get the picture. The treasure chest is either dropped into a spiky pit or a pit that you can’t jump out of. Alternatively, you could have a boulder come down and destroy a platform next to the one that the treasure chest is on. This would destroy both platforms as boulders can destroy up to three platforms in a row. Thieves can also be set up so a treasure chest is blocked off like in the exit blocker.
Ordered Traps
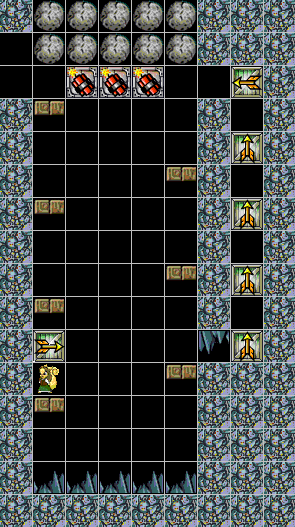
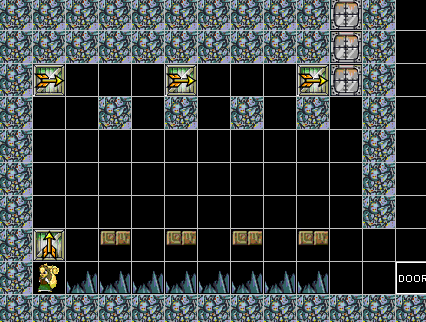
There are some traps where you start off in a sticky situation rather than being under threat of getting into one. Usually, this involves getting out of a locked room. The best way of making these challenging is to force the player to think about which order they make certain actions in to get out of the room. Look at this example and then I’ll explain it for you:
Hannah has to escape from the room by destroying the dynamite on the right-hand side. How does she do this? There are a lot of arrows in this room, one of which points at the dynamite. The player has to figure out how to hit the dynamite with this arrow when there is a steel crate in the way. It turns out there’s a combination of arrows that destroys this steel crate. Unfortunately, this combination itself is blocked by a steel crate. Luckily, there is another combination that can destroy this steel crate. Once again there is a steel crate blocking the way and once again there is a combination that can destroy it. This one isn’t blocked. In your mind, hit the arrows in the order in the next picture (blue, red, green and then yellow) and you’ll have access out of the room.
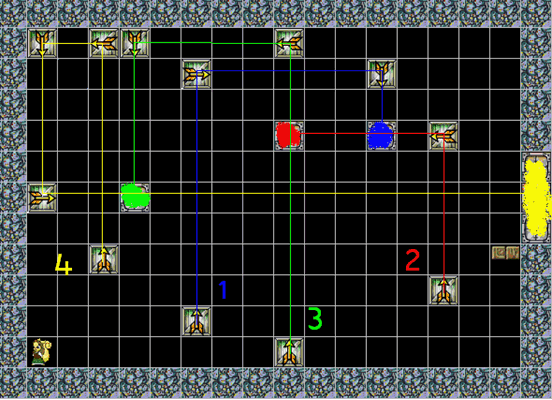
Got the idea? Most of the first examples in this section were mainly skill-based traps. This is a 100% puzzle trap; there is no physical skill involved so you just have to think to get out of it, just as much as you have to think in order to make one of these traps. We’ll return to puzzle traps later in the manual.
These are the most basic traps with the most basic examples of SOIB. The most common incentives for a player to do certain things in a trap are:
1. Death if no movement is made.
2. Death if movement isn’t made in a certain time.
3. Progression to other parts of the cave prevented if the trap isn’t completed.
4. A treasure chest is made inaccessible if the trap isn’t completed.
The art of cavemaking is to be able to force people to take the bait. This involves putting in boundaries/limitations. It is often very difficult to make a cave totally airtight with no ways of avoiding or breaking traps. More details of this will be made out later.
In any trap that requires physical skills such as speed, precision and flexibility, the objective needs to be clear. In a puzzle trap, the idea may be for the objective to be concealed or at least the means of getting to it concealed. In more advanced caves, the objective may only be revealed by looking at the map.
The set-up is the only part that really needs any imagination – this is the fun part. Every cavemaker makes traps differently and although the limitations, objective and incentive may be similar, the set-up will almost always be different from one trap to another. The set-up is what makes caves memorable.
In the next sub-section, we’ll be looking at how you can link traps together. A cave can look pretty ugly with each trap put in individual boxes. You could have some amazing traps in a cave, but the cave might not give the best impression. The way to solve this is to make some kind of connection between one and another that makes the cave feel like a cave instead of a group of traps.
| There are no comments yet, so feel free to be the first to comment. | ||
« Forum Index < The Hannah and the Pirate Caves Board
In order to post in the forums, you must be logged into your account.
Click here to login.
All games copyrighted to their respective owners.