
|
|
| tutorial 3 (boulders) Friday, August 28, 2009 6:52 am — Guide posted by canadianstickdeath |


 ShareThis
« canadianstickdeath's Blog
Level Introduction
 |
Click here for the level code of this level.
Wait, we're still doing tutorials? Yeah, there's a grand total of 6 of them, so after this we'll be halfway through. For tutorial 3, we'll be getting our first look at boulders. You may have caught a glimpse of few of them back in tutorial 1, lining some of the walls, or you might have even pushed one already if you went for the gem. You don't really get the chance to push them around all that much in the main game, though, but I guess the opportunity pops up from time to time. It'd be helpful if it turned up a little more, so that, when it comes up full-force in level 19, you'd be a little more prepared.
As far as the usefulness of the tutorial is concerned, it does a reasonably good job of explaining the concepts. It'd be more helpful if they mentioned that, when boulders land on other boulders, they will roll off, and then gave a little more detail on which direction they will roll when they do (but I suppose that might be a little too advanced for people that are just starting out). For the uninformed, boulders, if possible, will roll in the direction that they were last moving (see: momentum). The design of the level is better than tutorial 2's, but still nowhere near as impressive as that of tutorial 1's.
Walkthrough
Press jump to start? Of course, you press space to jump, but you already knew that, right? Yeah, you're getting the hang of it.
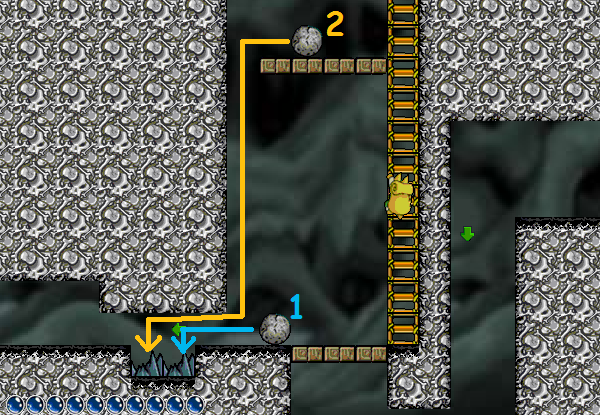
In the previous tutorial, we spent a lot of time heading to the right. Thankfully, tutorial 3 offers a much-needed change of pace. Today, we will be head almost exclusively to the left. So do let's begin. Start out by going to the left and pushing the first boulder that you encounter to the left. The idea of this boulder was that it was supposedly "blocking the way", but since you can push it, now it's not in the way anymore. That's... good to know... I guess... Anyway... Keep going to the left, jumping over a couple of boulders which cannot be pushed, and then pushing a boulder down through a couple of platforms. You know, somebody had to go through a lot of trouble to build those platforms... Anyway... You can also use boulders to cross gaps that you would otherwise have been unable to cross. In this next room, you need to push that first boulder to the left onto the spikes, and then head up the ladder and collect another boulder to push onto the spikes as well. The boulders will crush the spikes, allowing you to pass by unharmed. Had you attempted to pass without pushing the boulders onto the spikes, the spikes would have killed you.
 |
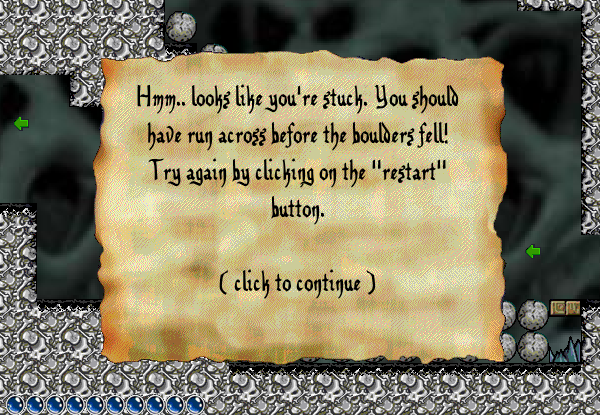
Next up, we have an arrow that's impossible to avoid, and will be causing a large amount of boulders to fall down, in an attempt to prevent you from continuing. What you need to do is hit the arrow, and then quickly run to the left, across the platforms. There's a lot of tutorial arrows strewn about, in case you forget which direction you're going (it's left, by the way). Now, when I say "quickly", I don't mean for it to sound like it's in any way difficult. As long as you never release the left arrow key, you'll always make it to the other side. Of course, if somehow you are too slow, you will likely be killed by the falling boulders, since "heavy" falling objects kill Hannah when she comes into contact with them. But, if the sound of all this running tires you out at the thought of it (or if you want to get the gem), skip ahead to the gem section below. It'll be the section that's completely surrounded by gems.
And for my last trick, I'll be having you jump to hit an arrow that'll cause a fair amount of boulders to fall down. What you'll need to do is stand clear, so that none of the boulders hit you. Finally, collect the treasure that landed on top of the boulders, collect the treasure on the platforms to the left, and now exit through the opened door! You're TOTALLY getting the hang of this, I can tell!
 |
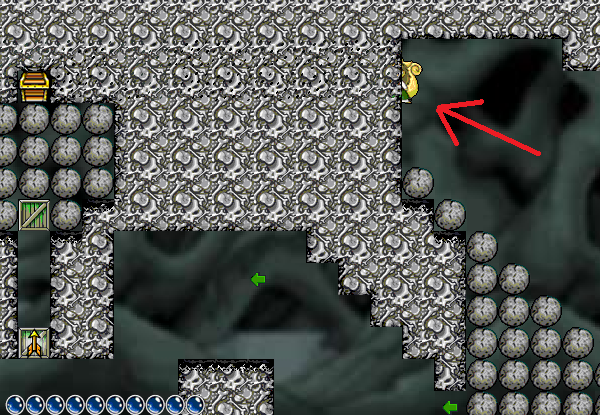
So you're up for another gem-collecting excursion? Well this time, the level makers are onto you and your schemes, so now they're purposefully trying to throw you off the scent. To get this gem, you'll have to ignore a tutorial message that tells you to outrun a large boulder fall, but not only that, you'll also have to ignore a second tutorial message as you make your way up the boulders after they've finished falling:
DON'T LISTEN IT'S A TRICK! I hate to admit it, but I actually fell for that the first time through. I was actually rather annoyed once I did find the gem. Anyway, continue up the fallen boulders to find a secret area at the top.
As you pass through the secret area you will collect both a treasure and the gem, eventually ending up next to the door. Complete the level by collecting the remaining treasure and then making contact with the door. | |
Video-Walkthrough
In this level, if you go for the gem, you will actually skip a fair portion of the cave, so for this reason, we have two "normal" walkthroughs, one with the gem and one without.
With gem:Made by Livio
Made by jellsprout
Max-Points
This is the first level in which you will actually have to go out of your way in order to get the most points possible. Thankfully, this one's not too hard to max-point. After completing most of the level and collecting the gem, instead of entering the door right away, you need to activate the trap that you skipped by going through a secret area instead taking the main path through the level. What you need to do is jump into a small gap to the right without ending up on those platforms with the treasures on them instead. If you do end up on those platforms, you can try again, as long as you don't accidentally exit the level through the door. Then, you need to jump up onto the platforms to the right, without hitting your head on the ceiling and then careening into the spikes, or something. After you do get up to there, complete the trap as normal, by hitting the arrow and then standing clear of the boulders that will fall. After you do this, exit the level through the door, but this time, you'll have completed it with the most points possible! Did you enjoy that? If you did, by level 6, you'll probably change your tune, and by level 19, you'll wish you'd never even heard of "HATPC points-mastery"!
Made by Shos
Now, if you're going for a high-score, and you don't want to die because you took "unnecessary risks", whether or not you go for these extra points is really up to you. They're not too hard to get, and you could probably get them, but then again, it's only worth 145 points (if my math is correct) if you do. Actually, 145 points isn't very much at first glance, but 145 points here and another 145 points there... It can add up pretty quickly. If you think you can pull it off, I'd definitely suggest you go for it.
| "tutorial 3 (boulders)" max-point level stats: |
| In-level points | 1320 |
| Treasures | 9 |
| Gem? | Yes |
| Extra Life? | No |
| End-of-level points | 9500 |
| Total points for this level | 10820 |
| Maximum points so far | 36760 |
| Remaining Lives | 4 |
Go back to tutorial 2 (arrows) || Continue to tutorial 4 (dynamite)
| shos | ||
| ~Jack of all trades~ Age: 31 Karma: 389 Posts: 8273 Gender: Male Location: Israel pm | email |
nice work. just one thing - the video - why does it have 15 seconds of pure black screen? i could have sworn there should have been something there.  | |
| jellsprout | ||
| Lord of Sprout Tower Karma: -2147482799 Posts: 6445 Gender: Male pm | email |
Dunno. I just entered the video's id and did nothing else. Spoiler: | |
| shos | ||
| ~Jack of all trades~ Age: 31 Karma: 389 Posts: 8273 Gender: Male Location: Israel pm | email |
i really feel like whining at youtube right now. earlier, when i saw this guide for the first time, the video's length was 1:25. now it's 1:24  and i *really* don't think that black gap in the middle was there before. i dunno, youtube is really annoying me lately. but nevermind that. i doubt anyone would need this video anyways. good guide. | |
| krotomo | ||
| The Shepherd Age: 23 Karma: 249 Posts: 4066 Gender: Male Location: My chair pm | email |
I think yoou just should have done something like: quick! keep going left! and then tell them to hit the arrow to make all the boulders fall down, then tell them to get the treasure and then FINALLY say, so? you wanna get the gem? Well TOO BAD becuase you ALREADY PASSED IT!!!   so, do you still wanna get the gem? well, remember that boulder trap? well if you are going to get the gem just WAIT for all the boulders to fall and when I say ALL I mean it. So, climb up the stack of boulders, and up there you will see a sign saying hmmm.... looks like you're stuck. But wait. It looks? does it mean I am stuck? so, keep climbing up the boulders and find the secret area. THE END. so, do you still wanna get the gem? well, remember that boulder trap? well if you are going to get the gem just WAIT for all the boulders to fall and when I say ALL I mean it. So, climb up the stack of boulders, and up there you will see a sign saying hmmm.... looks like you're stuck. But wait. It looks? does it mean I am stuck? so, keep climbing up the boulders and find the secret area. THE END. | |
| shos | ||
| ~Jack of all trades~ Age: 31 Karma: 389 Posts: 8273 Gender: Male Location: Israel pm | email |
'krotomo' said: I think yoou just should have done something like: quick! keep going left! and then tell them to hit the arrow to make all the boulders fall down, then tell them to get the treasure and then FINALLY say, so? you wanna get the gem? Well TOO BAD becuase you ALREADY PASSED IT!!! so, do you still wanna get the gem? well, remember that boulder trap? well if you are going to get the gem just WAIT for all the boulders to fall and when I say ALL I mean it. So, climb up the stack of boulders, and up there you will see a sign saying hmmm.... looks like you're stuck. But wait. It looks? does it mean I am stuck? so, keep climbing up the boulders and find the secret area. THE END. | |
| krotomo | ||
| The Shepherd Age: 23 Karma: 249 Posts: 4066 Gender: Male Location: My chair pm | email |
'shos' said: 'krotomo' said: I think yoou just should have done something like: quick! keep going left! and then tell them to hit the arrow to make all the boulders fall down, then tell them to get the treasure and then FINALLY say, so? you wanna get the gem? Well TOO BAD becuase you ALREADY PASSED IT!!! so, do you still wanna get the gem? well, remember that boulder trap? well if you are going to get the gem just WAIT for all the boulders to fall and when I say ALL I mean it. So, climb up the stack of boulders, and up there you will see a sign saying hmmm.... looks like you're stuck. But wait. It looks? does it mean I am stuck? so, keep climbing up the boulders and find the secret area. THE END. | |


« Forum Index < The Hannah and the Pirate Caves Board
In order to post in the forums, you must be logged into your account.
Click here to login.
All games copyrighted to their respective owners.