
|
|
| tutorial 4 (dynamite) Tuesday, October 20, 2009 5:34 pm — Guide posted by canadianstickdeath |


 ShareThis
« canadianstickdeath's Blog
Level Introduction
 |
Click here for the level code of this level.
Another level, another guide. So you're still with me? Next up is tutorial 4 and the introduction of dynamite.
Walkthrough
From here on out, I'm not going to tell you what you need to press in order to start the level. As difficult as it may be, you're just going to have to remember it yourselves. OK, one last time, you press the space-bar. Seriously, I'm not saying that again.
Start out by heading to the right, where you will encounter your first wooden dynamite crate. Wooden Dynamite Crates, when broken by Hannah directly, will cause a bundle of dynamite to fly in a (mostly) parabolic trajectory, whose horizontal direction will be determined by the side of the crate that is touched. That is, if you hit it from the left side (as you should do in this case), it'll fly up and to the right, but quickly, gravity will begin to pull it back toward the ground, resulting in a U-shaped flight-path. Also, if you break it from the right side, it'll fly to the left, but if you break it from either above of below, it'll fly straight up and straight back down. Once the bundle of dynamite is flying, be very careful to steer clear of it. Touching a flying dynamite will result in certain death. Of all the possible directions from which you can trigger a wooden dynamite crate, it is the most dangerous to trigger it by landing on it from above. Though it is possible to do this and survive, it is never required in order to complete any of the levels from the main game.
So, like I said previously, hit this first dynamite crate from the left side, sending it to the right, and watch as it flies into a pair of stacks of metal crates, destroying most of them. Did you see the resulting explosion when the flying dynamite hit the metal crates? It's very important that you stay away from that as well, or, once again, you'll end up dead. That's a lot of ways to die, isn't it? There's being hit by arrows, touching spikes, getting crushed by falling objects, and now being exploded! And that's not including messing up and being forced to restart, and the fact that there are another two ways to die what we haven't even come across yet! Eep! Proceed by jumping over the remaining metal crates to find another dynamite crate suspended in the air above a row of metal crates. This time, you need to jump up from directly below the dynamite, hitting the bottom of the dynamite crate, and sending the dynamite flying straight up and straight back down. Once the dynamite is flying, you, once again, must steer clear of both the flying dynamite and resulting explosion. Once the way is clear and the explosion has subsided, fall down through the hole in the row of metal crates that the flying dynamite has now created.
 |
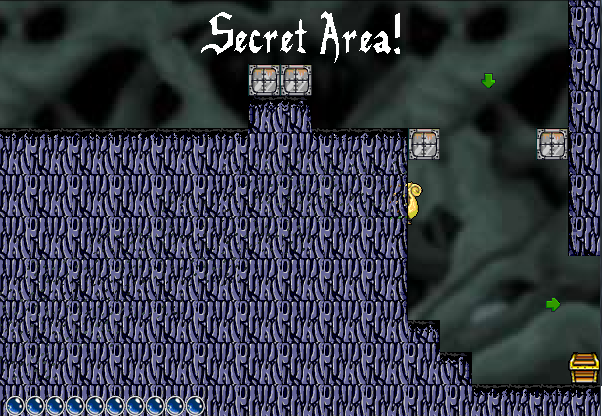
Gem-collecting time is here again! Hang your stockings over the secret area, and hope not to wake to find Mirgle droppings inside! From where you should be right now (just after passing the barrier unblocked by the second wooden dynamite crate, for those who are only reading this for the gem locations), don't take the obvious path to the right, but instead, veer left and jump into the wall, as shown below:
Continue to the left until you reach the end of the secret area, where the gem awaits. Collect the gem, and head back to the right. Since the end of the secret area is lower than its entrance, you will need to jump a few times in order to get back out. | |
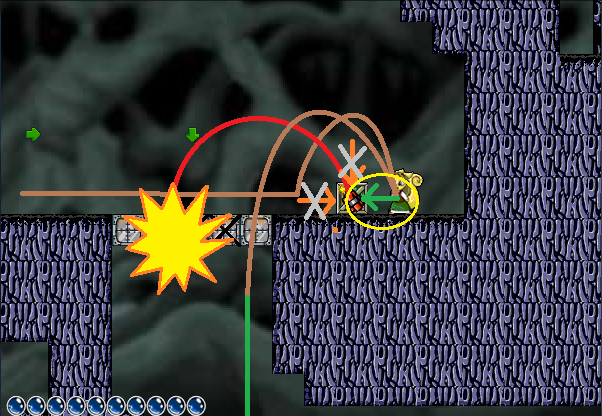
To the right is a treasure, so be sure to collect that, not that you were going to accidentally jump over it or something. Climb up the ladder, and then keep going right, until you locate another dynamite crate. This time, don't hit the dynamite crate right away, but instead, jump over to the right side of it (be careful not to accidentally hit it as you do) and hit it back to the left, so that it destroys the row of metal crates that were blocking you from continuing.
 |
Fall down through the newly-created gap and then continue to the right, where you'll collect another four treasures and get your first look at a Steel Dynamite Crate. These are dynamite crates that cannot be destroyed by Hannah, but if you disturb them by hitting them with arrows or exploding them with dynamite, they'll explode, destroying neighboring objects. In this case, you need to jump up and break a right-facing arrow crate, which, through a chain reaction of arrows, will set the steel dynamite crate into action. It'll explode (as always, steer clear), destroying most of the stack of metal crates, and allowing you to pass. Jump over the sole metal crate that remains, and climb up the ladder.
To your left is wall of metal crates and steel dynamite crates, which are blocking your path. Conveniently, there's an arrow crate to the right that can be used to destroy most of them. Hit that arrow, and watch some crates get blown up. Once everything settles down, go to the left and encounter the level's final trap. In the center of this room is an arrow, which, when triggered, sets of a chain reaction that eventually results in the unblocking of the final six treasures. When you trigger this last arrow, stay exactly where you are, so that you don't come into contact with any parts of the chain reaction as it's being set off.
 |
Once the chain reaction is completed, collect the remaining six treasures, and exit the level through the door, which is just a little farther to the left. You don't jump high enough from the pit where the treasures are to reach the terrain that the door is on, so you'll have to jump over said pit in order to get up to it.
Video-Walkthrough
Made by Livio
Max-Points
Nothing extra is required to attain the maximum score on this level. As long as you complete the level with the gem in hand, you've got it.
| "tutorial 4 (dynamite)" max-point level stats: |
| In-level points | 2010 |
| Treasures | 11 |
| Gem? | Yes |
| Extra Life? | No |
| End-of-level points | 10500 |
| Total points for this level | 12510 |
| Maximum points so far | 49270 |
| Remaining Lives | 4 |
Go back to tutorial 3 (boulders) || Continue to tutorial 5 (water 1)
| Isa | ||
| No. I'm an octopus. Age: 31 Karma: 686 Posts: 7833 Gender: Male Location: Uppsala, Sweden - GMT +1 pm | email |
Maximum points so far 49207 Shouldn't that be 49270? | |
| canadianstickdeath | ||
Age: 35 Karma: 350 Posts: 2990 Gender: Male pm | email |
There's a good chance of that, since HATPC scores are always multiples of 5. Something's wrong at least. Give me a second to fix that. | |


« Forum Index < The Hannah and the Pirate Caves Board
In order to post in the forums, you must be logged into your account.
Click here to login.
All games copyrighted to their respective owners.