
|
|
| Basics of CaveMaking Wednesday, May 13, 2009 9:48 pm — Guide posted by Livio |


 ShareThis
« Livio's Blog
The Basics of CaveMaking
Up until now, we've been looking at the completely technical side of CaveMaking. We've seen how to work with CaveMaker, and we've learned to manipulate our cave codes to cause some interesting effects in the final level. But from this point on, we will be looking at the actual process of making a cave. In this page, you will learn some standard information that you should know while building a level and the different types of things that you can do in a level. Then you'll build on that when you continue onto the Cave Design section, which starts in the next page.
This page is organized based on different concepts of using the tiles. You will see certain tiles included in multiple times in different areas, so don't expect a complete description of it in just one category. For more information of these tiles, see CAVEMAKING-4: Using Tiles, and In-Depth Look. I'm also assuming that you have a basic knowledge of most of these tiles by playing the Tutorial Levels.
Hannah and Keeping the Level Possible

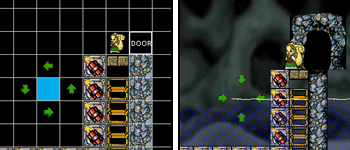
This part will talk about both the starting point tile and keeping your level Hannah-friendly in general. First of all, the starting point tile is obviously where you tell the game where the player should start out when they load the level. You can't make a level without a starting point, either. Technically, you can make a level without one by putting it in a line of code that will get skipped (as shown in the previous page), but that will only result in a Shockwave error. This tile is simple, but it has one major trick to using it. Hannah won't literally start at that very spot. Actually, Hannah's center will generate at the top-left corner of the starting point tile. This means that she'll really be half a tile more to the left and half a tile more up.
This is something significant to know because this means that any objects that you place within the four tiles around that point will be affected by Hannah when you start the level. This is very useful in designing traps that are automatically ignited when the level starts, but it requires a bit of testing to make sure that the player can't cheat their way past the trap.
Jumping
While building your level, you'll also need to know Hannah's limitations in order to keep your levels possible. The following list should have all of the information that you need to know about Hannah's jumping ability. It is in list form so that you may use this as a quick reference in the future.
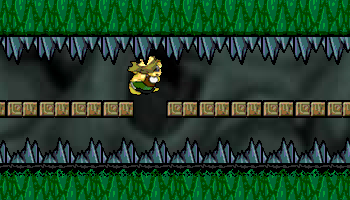
- Hannah's jump can reach up to 5 tiles high
- Hannah can duck-jump up to about 4.5 tiles high
- Hannah can jump onto tiles that are 3 tiles high.
- Hannah can jump onto platforms that are 4 tiles high.
- Hannah can jump across 4-tiled wide gap.
- This also refers to jumping over spikes that are one tile high (which is basically the same level as Hannah).
- Hannah can jump across a gap of 5 tiles if the sixth tile is a platform.
Duck-Jumping
"Hannah can duck-jump up to about 4.5 tiles high." But what is a duck-jump? To activate a duck-jump, you need to crawl by pressing the Down Arrow key. Then you need to jump while still holding the Down Arrow key. As long as you hold you crawl throughout, your entire jump will be a duck-jump. While duck-jumping you'll move the same speed horizontally as if you were still crawling. If you let go of your crawl in the middle of jumping, then your jump will return to a normal jump.
But how is this useful? As the list says, you no longer reach a height of 5 tiles in your jump, but instead you reach about 4.5 tiles. This is mainly used to avoid spikes that are on that fifth tile. If you place a spike (stalagmite or stalactite - they both work) on the fifth tile, then Hannah would die if she jumped normally. But if she duck-jumps, the spikes won't affect her. It's a very useful trick and it's widely used. Also, remember that it's 4.5 tiles, not 4 tiles. If there is a regular crate on the fifth tile, Hannah will still touch the crate if she duck-jumps. Duck-jumping also doesn't affect how many tiles you can jump onto. It's the same as a normal jump, but it's as if Hannah was crawling while doing it, even though it may not look like it. So you should still be able to jump on top of something that is three tiles high.
Duck-jumping is also useful in other areas as well as causing glitches, but we'll look more into that later.
The Other Essential Tiles
 Â
 
It's actually possible to make a cave without any treasure at all. Since having all treasures opens the door, having 0/0 treasures means that the door is automatically open. They also act like all other tiles, but they are indestructible. As you probably know, when you collect treasure, it's as simple as going over the tile. There is no recoil, so you will automatically grab it and then it'll instantly disappear. You'll be mostly using them as the goal of most of your traps, and as an excuse for the player to visit new areas within the levels.
Doors are mainly a background tile. They do not interact at all with rest of the level. In fact, the door itself is 3x2 tiles large, with the opening taking up the space of the DOOR tile that you placed in CaveMaker.
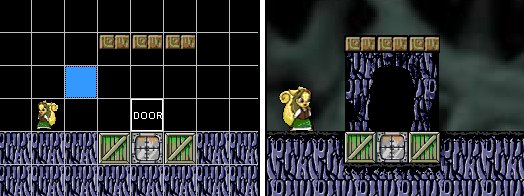
Most of the door is just decoration. The only accessible part of the door is the DOOR-tile itself. If you can't reach that tile (because, for example, a crate is on top of it) then you can't finish the level.
The Terrain Tiles
 Â
 
Terrain is that basic tile that shapes your caves. It can't be moved, it can't be destroyed, and it's great to use for basically anything that needs either a wall or a floor. Since it won't be destroyed or moved, it's easy to work with and keep track of. As stated in previous pages, you also can change the way terrain looks by changing the terrain type.
Secret Areas are exactly the same as terrain, but you can move through them. They can't move, they can't be destroyed, and they even look like terrain. Because you can move through them, they're perfect for creating hidden areas in your caves. They also have several advantages when used underwater, which we'll look at later.
When the player first goes inside a secret area when playing a level, the message "Secret Area" will float across the screen. However, this message only comes up during the first time, and it does not come up again within the same play. So, if you were watching a video of someone beating a level and you see the "Secret Area" message come up multiple times, then they obviously filmed it in multiple parts, instead of beating it in one try.
The Wooden Crates
 Â
  Â
  Â
  Â
  Â
  Â
 
All wooden crates have the same basic properties. They can be destroyed when the player collides with them or by an arrow or explosion. They are also affected by gravity when the tile below them is destroyed. Basically, when any tile is affected by gravity, they will fall down only when the tile below them is destroyed but not when they first appear in the game. This means that if you place a tile in mid-air, it won't fall down until something in the game makes it. While wooden crates are falling, you can actually jump straight through them without even breaking the crate. If you're on the ground and a wooden crate falls on you, then you destroy it, but if there's something deadly in it, such as an arrow or dynamite, then that will kill you. Even if there is something deadly in it, you can still jump straight through it in mid-air.
Because wooden crates can be destroyed with just contact, they have a lot of possibilities even if that specific crate doesn't do anything. Every time you break one of these, there is some recoil that makes you bounce back. This feature can be used in a variety of ways, such as to slow down the player. You can also bounce on top of wooden crates. There are several kinds of wooden-type crates, but we'll go more into them individually later.
The Steel Crates
 Â
 
Steel Crates are similar to wooden crates. The difference is that you can't break these crates easily. The only way that they will break is if they get hit by an arrow or by dynamites. Since you can't break them, you can stand on them. You really can do a lot with these. You can use these as a destructible and moveable terrain, but also as a way to force the player to use tiles such as arrows and dynamite. Also, if a steel crate falls on Hannah, whether she's in mid-air or on the ground, then it will kill her.
Dynamite
Â
When dynamite detonates, it affects all eight of the immediately surrounding tiles. When you hit a wooden dynamite crate, a piece of dynamite will fly out based on the direction in which it was hit. Hitting the side will send it towards the opposite side, while hitting the top or bottom will send it up until it falls back down. Hopefully you should already know these from playing the tutorial levels. As usual, both wooden and steel dynamite can be detonated via arrow or an explosion from another dynamite.
Arrows
  Â
  Â
 
You'll find yourself using arrows in almost every cave you make. They are the basics of most traps and can be used in many unique ways. One thing to know is that any arrows that fly on the second tile from the ground will not kill Hannah. So you may have been ducking from them all this time, but you really don't have to. Also, when arrows collide into things, they set off a mini-explosion, which lasts for about a second or half a second. During that second, be careful not to touch that explosion or you will die. This mini explosion is useful, however, for when an arrow hits terrain. If there is a stalactite or stalagmite on the tile where the explosion appears, then that will be destroyed instead. It's surprisingly useful, and this particular delay also affects tiles that happen to fall into the mini-explosion while it's still active.
Platforms
 Â
  Â
 
A platform is basically a one-way tile. You can jump up onto it, but you can't pass down through it again. It's destructible, so it'll get affected by arrows and dynamite like anything else. There's also virtually no difference among the three platform tiles. They even all look the same when you go play them in the game. Platforms can also be broken by boulders. The damage caused by a boulder is similar to how dynamite affects it: It breaks that specific tile and any other tiles immediately surrounding it. So if a boulder breaks through a platform, then three tiles of that platform will be lost. Besides the boulder, no other tiles go through platforms. Another interesting and commonly used trick is running across holes in platforms. For example, if you had a situation like this:
...you wouldn't fall, but you instead you would clip back onto the next platform and continue running. This is such a commonly used trick, that you may not get far in some levels without it.
An interesting aspect of platforms is that even when they are placed on the 4th tile from the ground, you can still jump onto them. Duck-jumping is also used a lot with platforms. For example, if a platform is on the fourth tile and two tiles above that there is an arrow crate, then when you jump onto it, you will automatically hit that crate because you were standing up when you clipped onto the platform. However, if you duck jump, you'll clip onto the platform in crawling form, and you won't detonate that arrow. The reason that you don't touch it is that the arrow is on the sixth tile, not the fifth, so the point of duck jumping isn't to avoid the arrow but to be in crawling form when you land on the platform.
When a steel crate is directly on the platform, then when you jump up the crate won't let you clip onto the platform. However, if you duck-jump, then you will clip onto it, but you will also merge with the crate and become stuck in it. Even if the steel crate gets destroyed, you'll die with it. This is mostly useless, unless you apply it to other tiles. If you do this with a boulder, then you will push the boulder. This is very useful in separating two boulders that are directly next to each other. It's also useful in pushing a boulder in a specific direction that you would not have been able to do otherwise. However, if it's impossible to push that boulder in any direction then you will get stuck, just like with the steel crate.
You can also apply this to wooden crates. Usually, if a wooden crate is directly on the platform, you will clip onto the platform anyway while at the same time destroying the crate. Having a wooden crate there will also stop you from jumping any higher than necessary to land on the platform. But if the platform is on the fourth tile, you will break the crate when you try to jump up to it, but its recoil will push you back down. If you want to jump onto the platform without getting pushed back down first, then you must duck-jump onto it. If you try to this with an arrow crate or dynamite crate, then they will kill you.
Boulders

Boulders are probably the only tiles that can be moved horizontally, and they can also kill you if they land on you. There are tons of useful glitches associated with boulders, but those won't be explained until CAVEMAKING-4: Using Tiles, an In-Depth Look. Boulders can be used in a variety of ways. For some reason, the most popular method among newcomers is to make a ton of boulders fall into the room below, as seen in the end of Tutorial Level 3. That gets old really quickly and serves no real purpose other than to make the previous area inaccessible if done right. However, boulders can also be used in various types of puzzles, and these puzzles a not just limited to ones such as the one in the middle of Level 19.
Using boulders is quite simple, but knowing exactly how they will work without any testing is a bit complicated. As you probably know, when Boulder-A, for example, lands on top of Boulder-B, instead of stacking on top, Boulder-A will slide off and continue falling towards the right or left of that boulder. If a tile is blocking one direction, then the boulder will fall to the other side. If both sides are blocked, then they will stack on each other. It's pretty much common sense, but there are even more exceptions -- some that you may never even predict -- but these are explained in further detail in CM-4, along with several other boulder-related glitches.
Spikes
 Â
 
They're technically called stalagmites and stalactites, but we call them "spikes" for short. First of all, spikes are not solid tiles. Anything can go through a spike, as if it was in the background. However, if the player touches a spike, even if they touch the other side of it, they die. They're great to keep the player within limits without having to build a wall. Placing spikes in midair can look strange if you don't do it right. A common method is to place spikes "back to back" in the following way:
Because this method is so commonly used, whenever you see a random spike in mid-air, many automatically assume that it was left over from a trap that was already detonated. So using random spikes without the "back to back" appearance can give the impression that a cave is either incomplete and messy or random and scattered. It'll give a positive or negative feeling to your level depending on how you use it (or not use it).
While solid objects can move freely through spikes, if an object stops falling on top of a spike within the same tile, then that spike will be destroyed. You can also push boulders horizontally across spikes to destroy them. Explosions also destroy spikes, but arrows fly right through them. However, as explained before, arrows can destroy spikes if the arrow hits terrain and if the mini-explosion caused by the arrow affects a nearby spike.
The actual range of death that a spike has is less than the full tile. In fact, only about half of the space within the spike's tile will kill you. This is good because it's easy to predict when the spike will actually kill you, rather than getting killed by clear air. This is also why duck-jumping is so successful against spikes.
Tutorial Arrows
 Â
  Â
  Â
 
Tutorial Arrows work exactly like spikes, except that they are not deadly. They linger in the background not affecting solid objects. They can be crushed and destroyed in the same ways that spikes are, too. Tutorial Arrows can be used for several reasons. You can help or confuse the player, but that's about it. You can also use it for decoration or just for emphasis.
Do not trust the tutorial arrows on CaveMaker. The images are mixed up. For example, the tile labeled "Tutorial Up" has the right tutorial arrow as its image. Make sure to read the text because that is what will show up in the code, not the image.
Gems and Hearts
Â
These are the two tiles that are mostly used as extras or rewards in levels. By using gems or heart crates, you can create secret, alternate paths in your level. Hearts serve no real purpose while playing user levels, because you basically have unlimited lives. However, there are still some things that you can't do if you don't have enough lives. You can't use the Restart button if you have 1 or 0 lives left, which can be very annoying considering that you really have unlimited lives. Therefore, using the life crate serves no real purpose other than to add a fun extra section or to reward the player.
CaveMaker won't let you add multiple gems or hearts and neither will the uploader. As explained in the previous page, you can get around that by adding lowercase "g"s and "l"s to your cavecode.
Ladders

Ladders are strange objects. At times they feel like they only exist in the background, but at other times they interact with objects. Ladders usually act like solid objects. They can get destroyed by both arrows and dynamites, and items can fall on ladders and stack on top of them. You can't push boulders into where a ladder exists, but you, as well as enemies, can walk freely as if the ladder wasn't there. That's where the awkwardness of ladders comes from. You can move so freely past them, but it's as strong as a steel crate when it comes to interacting with other tiles. Ladders also aren't affected by gravity at any time.
You will automatically cling to any ladder whenever you're in mid-air. You can also jump from the ladder at any time. While on the ladder, you can move both horizontally and vertically, which is very useful. However, you should avoid making long paths of ladders because moving horizontally on a ladder is very slow and boring. Also, while underwater, you will slowly move upward if you're on a ladder. If you're slightly above the water and on a ladder, you will also slowly move down.
Enemies
 Â
  Â
  Â
  Â
 
The enemies will kill the player with just contact. The AI functions of all the enemies are the same: they move left to right, switching directions only when something gets in the way. Enemies cannot travel through anything that Hannah can't. This means that they can't go through steel crates or boulders, but they can go through wooden crates, secret areas, and ladders. They can't be destroyed by anything, which means that they can go through spikes. The enemies are also poorly named by a number, so we'll call them by how they look like.
The Bird enemy is basically 1 tile big, and it isn't affected by gravity. It has the slowest speed of all the enemies. Another flying enemy is the Skull, which is basically a flying head. It's also a 1x1 tile enemy, but this one affects about one fifth of the tile above it. It's kind of useful in some incidents, such as putting a Skull on the same line as a platform and having the player dodge the Skull as it travels back and forth below. It's also the fastest of all of the enemies. The last of the flying enemies is the ghost. The ghost is about 1.5 tiles tall and one tile wide, and it has the average speed. The tile that you set in CaveMaker is where the bottom-half of the ghost is. As explained in the previous page in the section that explained adding more enemies than CaveMaker allows, the ghost is the only enemy that cannot appear more than once in a level. If you try to add multiple Ghosts, only the very last one in the code will appear.
The walking enemies are a bit more complicated. A walking enemy has almost the same characteristics as Hannah. They are affected by gravity, they can walk on terrain, steel crates, platforms, boulders, or anything else that Hannah can walk on. They will also turn around if they can't walk any further like if, for example, there is a hole in the way. The Monkey enemy, like the Bird, is 1x1 tiles in size. It's the same speed as the Ghosts, which means that it's the average speed. The Zombie is about 1.5 tiles tall and 1 tile wide. It's also as slow as the Bird.
Using enemies can often be unnecessary for most situations, but I believe that in order to use an enemy to its fullest, you must design the trap to specifically work with the enemy. For example, there could be a trap involving dropping an enemy into the room by destroying the path that it's walking on, or you can create tension, such as where you need to solve a puzzle while dodging the enemy.
Using Water
 Â
  Â
   Â
 Â
Not many people use water in their caves anymore. While no one likes a swim-through-spikes cave, there are plenty of amazing things that you can do with water. It takes real creativity to use water to its fullest and to incorporate it smoothly into traps. I intentionally left this section last because water is tricky to use. The water-related crates are especially complicated to understand, so if you want to understand this completely, pay close attention.
Water Level
Â
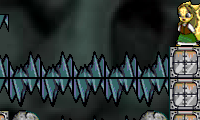
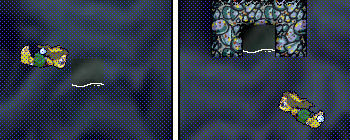
The water level tile tells the game to fill your entire level with water up until that point. It's the most basic and simple way to use water and it doesn't cause too many problems. One thing that you might want to know is that the water level fills the water up to half of that tile. In fact, that's what happens to all of the tiles to the right of the water level. Everything to the left of it is filled up to the full tile below the row in which the water level tile was placed on. To better understand it, look at this image:
The water level tile is marked by tutorial arrows. You can see the glitch that occurs to the area behind the tile. That's why it's advised that you place your water level tile as far left as you can, or as far right if you want the water to look flat. So this glitch isn't completely bad since it gives you more control on how the water appears.
Air Pockets
Â
It's unfortunate that after adding the water tile, CaveMaker does not add some sort of effect to change the color of the tiles beneath it. If it did that, then maybe we might be able to actually see this tile after placing it in. However, you can see the tile if you highlight the area.
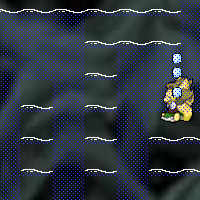
Air Pockets basically add an area where there is no water. If you swim into an air pocket, you'll suddenly be affected by gravity again, and you'll also gain more air. However, making air pockets look good most of the challenge in using them. For example, compare these two images:
Obviously, the second one looks more realistic, but the first one isn't completely bad as it gives a different mood than when it's enclosed in terrain. However, what doesn't look good is when you try to merge these two. If you put some terrain around the air pocket, but do it incorrectly, then it looks terrible. Something interesting to do, however, is to create long chains of air pockets, such as this:
Using air pockets in a chain like this can help create some interesting traps. It's better than using spikes because it's not as frustrating and it has a lot of fun factor to it, especially if the player is in a frantic hurry to reach the top, but he/she keeps falling down the air pockets. Remember that air pockets are just tiles where there is no water. Despite the little water animation below it, there is absolutely no water in these tiles. So you can thus create an entire room with no water in it in the bottom of a large body of water. The only problem is that there has to be an air pocket in every single tile. Any other tile will just have water in it when that tile is moved or destroyed. However, you can use this to your advantage to map out trails that are occupied by traps that must be detonated before gaining access to them. The result is a water-less room with a trap in it that after detonated turns the room into a unique water route. It's a really interesting concept, which can help make some interesting underwater traps and rooms.
There is yet another tile that is similar to the air pocket. It is the secret area. You'll find that when you go into a secret area, it's exactly the same as an air pocket. The difference is that it's solid, and items can't travel through it. However, it's a great way to actually hide your air pockets if you don't want the player to know where they are.
Another thing to know about air pockets is how they react to rising water. Unless the air pocket has a piece of terrain (or secret area) directly above it, then the air pocket will be filled with water as the water rises. This is assuming that the air pocket was placed outside of water at the start of the level. As long as there is one piece of terrain above it, then the air pocket will still be there when the water reaches it. Air pockets are virtually useless outside of water, by the way.
Water Taps
Â
The first reason you may want to use water taps is to change the water level. This tile basically releases water at a constant rate, which raises the overall water level. However, instead of affecting all of the water in the level, the water builds up in specific areas first. So if you want to create a level where the player has to rush to beat the level, you can use this tile. However, this concept is pretty boring and once you've played something like Level 13 playing anything similar will just bore you. Thankfully, water taps have another great purpose: to create areas that contain water without having to fill the entire cave with water.
Recall from the previous page that you can remove the border automatically created by CaveMaker. You can thus create bottomless pits where you can literally throw anything into perpetual free fall. So what happens when a water tap finds its way into a bottomless pit? Well, it basically stops giving out water, so you have just turned off that water tap. It seems like an extensive way to turn off a water tap because it requires access to the bottom of the level, but there is yet another way to stop taps. We've called this new method the Water Drain Glitch, and it involves using terrain to split two water taps between two blocks of terrain to cause a strong enough glitch-up to kill the taps without causing a Shockwave error. This is further explained in its own page in section 5.3: The Water Drain, but it's best to learn about that after finishing this page.
But why do we want to stop water taps? It might not be the same as lowering the water level, but it prevents the accumulation of water in other parts of the cave where you don't want any water. An outstanding example of using this technique to create controlled areas of water is CSD's "The Cascades". It uses several things that we haven't covered yet, along with almost all of the glitches that we've discovered at the time, but it's a great example of how to use water taps to fill only parts of your level with water.
There is a large amount of free space in that level, but this is probably the only way that you can ever have free space underneath a "tank" of water in HATPC. Also, don't think that your caves have to be as open as this for it to work. You can have closed caves and make almost unnoticeable paths to the bottom of your level.
When working with taps, it's necessary to understand what tiles affect water, and what tiles don't. There are only two tiles that will shape the path of a water tap: terrain and secret areas. Because everything else is destroyable and moveable, they can't hold water. You may think that because of this, you are now limited to only entering areas of water through the top, but that is incorrect. As we saw in "The Cascades" Walkthrough, secret areas were used to create entryways into the water-filled areas. Don't think that secret areas always have to be as hidden as possible. Sometimes, it's good to make secret areas obvious because they are necessary. To help with this, the green terrain type is perfect for making secret areas noticeable.
The Water Crate
Â
This is the first tile that you have not seen in the tutorial levels. You saw it briefly in "The Cascades", but now you will learn how to use it. If you do not see this tile available in CaveMaker, you still haven't downloaded this version! Obviously, Neopets, at the last minute, decided not to include this tile into the game because of its complexity. However, they did not remove the coding from the game itself, so thankfully, it still exists. Basically, when the water crate is broken, it releases a certain amount of water into the level, thus allowing you to tell the game when to add water. Unfortunately, it's much more complicated than that.
First you need a water tap. The water does not come gushing out of the crate and into the area immediately. Instead, it tells each water tap to release a certain amount of water. If you have multiple water taps, they will release even more water overall. However, if you tried to use the water crate from CaveMaker, you'll find that nothing appears in the level. This is because CaveMaker does not actually set a character for the water crate. You must go in and manually add the code yourself. The character for water crate is "@". Now try it! If you're having trouble getting the water crate to work, remember that you need a water tap to release the water. Also make sure that you don't have any bottomless pits.
But how much water does a water crate release? According to Jellsprout, "A water crate adds 147 bits of water for each tap in the level. . . . 8 bits of water go into one square." So if you had one water crate and one tap, a little more than 18 tiles worth of water will come out. You should also be careful when using too many water crates. The game slows down significantly whenever one of these is broken because it's calculating the paths of all of that water. If you ever find yourself placing a ton of water crates in an area to make the water rise faster, you can always use a water level or a series of multiple water taps to fill different sections individually.
You may have noticed something strange with this particular crate when you hit it. It has virtually no recoil, which means that you didn't bounce back when you broke it. This feature alone can be good for traps. If you have absolutely no water taps in your level, then the water crate does nothing when broken. This means that you can take advantage of this crate's lack of recoil for some traps. It also looks very similar to the standard wooden crate, which can also be used for confusion.
The Water Tap Crate
Â
While the water crate let's you add bursts of more water to your level, it still doesn't have the exact kind of control as we would've liked. That is the purpose of the water tap crate. All you have to do is put it in your cave and none of the water taps will flow, and when the crate is broken, the water taps are turned on. This means that you don't have to create long paths to delay water taps, but instead you can just simply put this crate. You can also put multiple tap crates in your level, but once one of them has been broken, the others don't do anything.
Of course, CaveMaker does not have the correct coding for the Tap Crate. The real character for the Tap Crate is "!". This crate also needs water taps in order to be effective, otherwise it does nothing. Now try it in a level of your own. When you load the level, there shouldn't be any water coming out of the taps, and when you break the crate, the taps should start.
Alone, these crates are pretty okay, but when you use the water crate and tap crate together, that's when you realize the real power in them. Let me show you an example. You can make a cave with a water tap in it, but since you don't want it to start flowing, you put in a tap crate. Now, put in a water crate, and what happens? When broken, the taps release a gush of water, but immediately stop flowing afterwards. The tap crate keeps the water taps from flowing continuously, but the water taps still responded to the command of the water crate to release the specific amount of water. Hopefully, you've just realized the incredible amount of control that these two crates can give you.
Now you aren't just limited to the linear concept of a rising water level. Now you can control when the water rises, when it stops, and where it goes. Like I said before, it takes real creativity to work well with water, and that's because there is so much that you can do with it.
Testing and Timing
I strongly advise you to test your levels as you make them. It's almost impossible to know if a trap will completely work without testing it. There are way too many new members who make a level without any form of testing, and there will never be a time when you know so much about HATPC that you will never need to test anything again. Another thing is timing. If you make an incredibly awesome trap that only attacks the player once he/she has already left the area, then it's a waste of a trap. Or if you make a trap that is timed too early, then no one can continue the level. You need to make sure that your traps are timed the way that you intended them to be.
This all requires that you upload your level multiple times so that you can play them. If you don't want to risk people seeing your latest work before it's done, then you can always create a new and secret account on Neopets.com. If you upload your testing levels onto there, no one will ever find it.
The Conclusion
This brings us to the end of this lengthy page as well as the end of the Introductory section of the CaveMaking part of the Manual. In 1.1, we looked at the CaveMaker program and learned where everything is. We also learned a lot about different techniques to make the program faster and easier to use. Then in 1.2, we learned about cavecodes and how to manipulate them to our advantage. And finally, here in 1.3 we learned extensively about each of the different tiles, their abilities, how to use them correctly, and how to avoid related problems. We also learned about how to use water and the new water crates and water tap crates. And now, you're probably going to take this and start to find ways to implement them into your actual levels. Be sure to remember to come back to these pages for reference in the future, and if you didn't quite understand something, contact me. Also, be sure to check out Jebby's Cave Design section which starts on the next page.
| canadianstickdeath | ||
Age: 35 Karma: 350 Posts: 2990 Gender: Male pm | email |
I dunno how many times this occurs, but the various blogs don't link to each other very well. For example, this one doesn't link to the article on water crates and water taps crates. It'd be cool if somebody would go through and link the guides together when applicable. As well, when making new blogs into notable ones, check through the existing notable blogs and see if there's anything the new one should link to and visa-verse. | |
| Livio | ||
Age: 31 Karma: 470 Posts: 9620 Gender: Male Location: Arizona, USA pm | email |
I'm gonna go and break up some of the information in this post into smaller articles, while getting rid of all the wordy/useless information. But yeah, we should add a bunch of "See Also" links to some of the guides. For example, jell's guides on all those dynamite glitches could have a "See Also" section linking to the other dynamite glitch guides. | |

« Forum Index < The Hannah and the Pirate Caves Board
In order to post in the forums, you must be logged into your account.
Click here to login.
All games copyrighted to their respective owners.